Showing posts with label Tutorials. Show all posts
Showing posts with label Tutorials. Show all posts
28 August 2014
Spellbinders dies can be used to create stencils that can be used to mask areas off when working with Jac Paper and glitter.

Products Used:
Bazzill Basics Cardstock:
10-1023E White OP
10-1037E Blackbird
Spellbinders:
S2-048 Sprigs
S5-172 A2 Curved Matting Basics B
Other Materials Used:
Glitter
Jac paper
Cosmo Cricket Tiny Text
Step 1
Cut a piece of Jac paper to the correct size and adhere it to a piece of cardstock. Cut out the centre of the backing paper with a Curved Matting Basics B die.

Step 2
Replace the Curved Matting Basics shape in the centre of the exposed Jac paper, and sprinkle yellow glitter onto the edge. Burnish the glitter well to ensure adhesion between each step - this will ensure there are no sticky bits left where subsequent glitter colours will stick.

Step 3
Remove the Curved Matting Basics shape and cut a couple of Sprig shapes from it. Apply these to the exposed centre of the card front, and sprinkle pink glitter onto the Jac paper. Burnish well.

Step 4
Remove the sprig shapes and apply blue/green glitter. Use this to complete a card.

Tutorial created by Design Team member-TERESA
27 August 2014
.jpg)
.jpg)

Products Used:
Bazzill Basics Paper:
10-1001 Bazzill White
1-105E Petalsoft
5-510E Parakeet
Spellbinders:
S5-214 Scalloped borders 3
S4-371 Les Papillions
S5-086 Bitty Blossoms
S2-048 Sprihs
S2-067 Create-a-rose
Other Materials Used:
Bo Bunny papers and ribbon
Step 1

Cut a strip of cardstock to 6x12 inches. Arrange two border dies together at one end, and tape in place before die cutting.
Step 2

From the opposite end mark intervals at 10, 6 and 10cm, then score and fold.
Step 3


Create a box from the remaining strip of cardstock trimmed to 14.5x23cm. Mark and score lines at 4.5cm, then 14cm, then another 4.5 across the long end, and 4.5, 5.5 and 4.5cm along the adjacent side. Cut notches in the corners as shown, then glue to he tabs to the inside of the box. Adhere inside the bag.
Step 6

Cut narrow strips and join together for the handle. Adhere the ends to the sides of the box.
Step 7

Hold bag closed and mark a spot for the notch to hold it closed, using the die cut pattern as the hook.Open bag and cut the notch. (note you may like to wait until you have added patterned paper.
Go ahead and decorate with patterned paper and a Spellbinders Create-a-rose.
Created by Design Team Member - ALICIA
20 August 2014
Here is a fun idea for a child's door name plaque.

Materials used:
Bazzill Basics Paper:
10-1001 Bazzill white
Spellbinders:
S4-092 Stars Five
S5-159 Gold Labels Four
LF 190 Grand Labels Four
S5 077 Labels 25
Other Materials Used:
Kaisercraft name plaque
Kaisercraft paint
My Mind's Eye papers
Platinum Ranger Liquid Pearls
Floral Wire
Utee embossing enamel
Step 1

Paint timber plaque and allow to dry, then cover front face in patterned paper
Step 2

Die cut labels in three sizes from patterned paper and card stock, and layer together with foam dots.
Step 3

Cut floral images and adhere tucked behind labels. Paint and emboss letters, then adhere to the centre of the labels.
Step 4

Die cut a series of stars from patterned paper in varying sizes. Adhere to the back of the plaque and to the front. Layer some with foam dots.
Step 5

Coil floral wire around a pencil to curl. Adhere to the back of a die cut star, then adhere a second star to the top with foam tape.
Step 6
Adhere the wired stars to the back of the plaque.
Tutorial created by Design Team Member ALICIA
29 May 2014
I love that we can manipulate paper and cardstock to make them look like
something else. Here I paper piece, emboss and then add gloss to make a
piece that looks like a ceramic tile. It reminded me so much of the hand
painted tiles I saw in the Alhambra in Spain, that I incorporated the piece
into a Bon Voyage card for a traveller.

Products Used:
Bazzill Basics Cardstock:
8-808E Vanilla
9-960E Kraft
Spellbinders:
S4-368 Hexagons
EL-031 Diamond Fleur De Lis Embossing Folder
S2-026 Window Three
Other Materials Used:
Xpress GraphX Triple Tac Adhesive
Stamper Anonymous Playful Journey stamp
Lily Bee Designs 6x6 pad
Step 1

Cut shapes that will tessellate (eg hexagons, squares, rectangles) in a
variety of coordinating papers.
Step 2

Using Triple Tac, adhere these shapes to a piece of cardstock that has been
cut to size.
Step 3

Dry emboss this piece using an embossing folder.
Step 4

Sponge some brown ink onto the embossed piece to bring out the detail.
Step 5

Apply a thick coat of Triple Tac over the top to seal.
Step 6

Allow to dry and the result will be a glossy embossed piece ready to use on
your project.
Tutorial created by Design Team member-Teresa
1 April 2014
I needed some little notebooks that would fit inside my small handbag and
thought I would decorate the covers with some embossed paper. When the
scraps of embossed paper I had weren't big enough, I decided to create my
own. I have shown an example here of embossing (green) and debossing (red) -
it gives a slightly different look.

Products Used:
Bazzill Basics Cardstock:
1-107E Quartz
Spellbinders:
Es-016 Cabbage Roses embossing folder
Other Materials Used:
VersaMagic ink
Acrylic paint
Twine
Sewing machine
Clear embossing powder
Step 1

Emboss the cardstock.
Step 2

While the cardstock is still in place in the embossing folder, gently rub
some Versamagic ink over the bumps created.
Step 3

Sprinkle some clear embossing powder over the entire sheet and use a heat
gun to melt.
Step 4

Paint over the whole sheet with some acrylic paint.
Step 5

Use a baby wipe or wet cloth to wipe the acrylic paint off the embossed
areas.
Step 6

Cut several sheets of paper to size, centre them on the back of your
embossed and painted cardstock, and sew right down the centre with a sewing
machine. These little books will have a tendency to spring open for a while,
so I have tied them with some twine to keep them closed.
Tutorial created b y Design Team Member-TERESA
28 January 2014
I love the look and feel of embossed fabric. Here's how I did it in a few
simple steps:

Products Used:
Bazzill Basics Cardstock:
8-816C Walnut Cream
Spellbinders:
ES-016 Cabbage Roses
S5-191 Decorative Labels Twenty Eight
S5-127 Labels Twenty Eight
Other Materials Used:
Prima patterned paper
Calico fabric
Distress Inks - Wild Honey, Ripe Persimmon, Spiced Marmalade
Darkroom Door Simple Sayings stamp
Step 1


Apply a thin layer of PVA glue to a scrap of cardstock that's slightly
larger than what you need. I used the edge of a plastic credit card to
ensure the entire piece was covered.
Step 2

Place the fabric onto the glue and smooth it out. Use a brayer if you have
one to ensure all of the fabric is stuck down.
Step 3

Give the glue a few minutes to completely dry, and then emboss the fabric
and cardstock.
Step 4

Apply colour to the embossing using various colours of Distress Ink and a
sponge. Adhere the piece to the front of a card and finish it off with a
stamped sentiment on a couple of die cuts.
Created by Design Team member-TERESA
8 October 2013
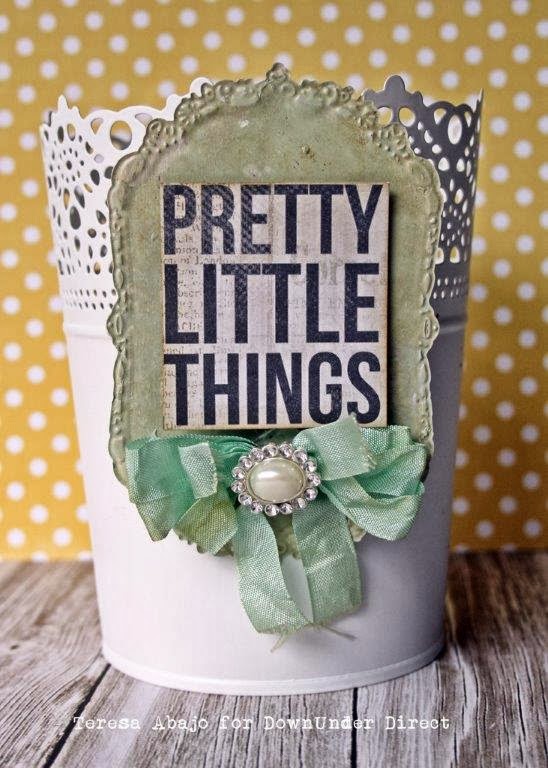
With Spellbinders dies, you can cut a wide range of decorative shapes out of
a variety of materials. I had this beautiful Labels Four shape cut from
foil, and I wanted to give it a little bit of a shabby chic look. Here's how
I did it:

Spellbinders
S5-159 Gold Labels Four
F-012 Precious Metal Foils
Other Materials
KaiserCraft Take Note patterned paper
Seam binding
Decorative pearl button
Ranger Distress Paint Bundled Sage
Gesso
Ranger Distress Ink Brushed Corduroy
Step 1


Cut the shape using Gold Labels Four, and give it a coat of gesso. The
rougher the better, as it all adds texture to the finished product.
Step 2


Using the Distress Paint dauber, apply paint using a pouncing action. This
also adds texture.
Step 3

When the paint dries (it can be sped up with a heat tool), apply some brown
ink with a sponge.
Step 4

Adhere a magnet to the back.
Step 5

Embellish the front. Here I have used words from a sheet of KaiserCraft
paper, a seam binding bow and a decorative pearl button.
It will now attach to a metal surface, such as this beautiful tin from Ikea as seen in the main photo.
Tutorial created by Design Team member-TERESA
Tutorial created by Design Team member-TERESA
25 September 2013
This is so easy to put together with a couple of die cut pieces and some cardboard in between – beautiful for a special friend.


Products Used:
Bazzill Basics Cardstock:
19-10305E - Vanilla Cream
Spellbinders:
S4-389 – Decorative Labels Twenty-Two
S4-346 Labels Twenty Two
S5-086 Bitty Blossoms
Other Products Used:
Stamp It stamp set Archival ink - coffee
Tim Holtz Distress Ink
Tattered Angels glimmer mist
Ice Resin
Aluminium sheet
Helmar Acid Free
Tim Holtz Distress Marker
Helmar 450 Quick Dry
Patterned paper
Step 1
Take your chosen die and colour ink pad. Be sure to choose a slow drying ink pad

Step 2
Ink the inside area of the die
Ink the inside area of the die

Step 3
Cut out the cake element out of the paper design

Step 4
Place the die where you want to cut and simply tape it a little to stay in place

Step 5
Run it through the Grand Callibur and a second time with the embossing mat

Step 6
Remove it from the die and the piece is now framed with the colour from the the ink pad. Add a little inking very fine to the end to with a matching distress ink pad

Tutorial created by Design Team member-BECK
Subscribe to:
Posts (Atom)