Showing posts with label Spellbinders-July 2011. Show all posts
Showing posts with label Spellbinders-July 2011. Show all posts
5 September 2012
Today we have a whimsical layout featuring the new Spellbinder Dies Up Up & Away.

Products Used:
Bazzill Basics Paper:
10-1001 White
1-105 Petalsoft
6-620 Wisteria
7-7112 Sea water
Spellbinders:
S5-126 Up, Up & away
S5-150 Pockets & swirls
S5-050 Rose Creations
S4-370 Blossom 5
Other Materials Used:
Kaisercraft Patterned paper
Tattered angels glimmer mist
K & Co Number
Brads
Button
Layout created by Design Team member- CAROLYN
23 May 2012
Making the Bitty Blossoms is such fun, they are small enough to pop on any card.


Products Used:
Bazzill Basics Cardstock:
9-948E Nutmeg
8-808E Vanilla
7-726E Lakeshore
Spellbinders:
S5-086 Bitty Blossoms
S4-328 Foliage
S5-064 Moroccan Accents
Just Rite Stamps:
JB10025 Nested Oval Medallion Label Dies
CR02255 Just Keep Calm
CL03540 Warm and Cosy Medallion Labels
CL03565 Fleur De Lis Background Stamp
Other Materials Used:
White Glitter
Old book page
Black ink
Teal ribbon
Scattered Straw Distress Ink
Card created by Design Team member-SUE
16 March 2012
Today we have another lovely layout from Sheree.

Products Used:
Bazzill Basics Paper:
10-1081 Raven
3-370 Festive
Spellbinders:
S4-295 Lacey Squares
S5-101 Wings of Hope
S4-324 Ribbon Banners
BLING-abilities:
BLLC00034 Lacey Squares
Other Materials Used:
Kaiser Patterned papers
Kaiser envelope
Layout created by Design Team member-SHEREE
15 March 2012
"This card shows yet another way to use Rose Creations to make a professional looking flower, this time I have spritzed and twisted the petals together to give a spiky look."

Products Used:
Bazzill Basics Cardstock:
2-227E Pomegranate
5-510E Parakeet
8-808E Vanilla
Spellbinders:
S5-035 Parisian Motifs
NEST-005 Nested Circles
S4-328 Foliage
S5-050 Rose Creations
S4-329 Butterfly Circles
EL-009 M-Bossabilities
Flora
Other Materials Used:
Black fibre
White glitter
Red glitter
Red brad
Gold rub on paint
Card created by Design Team member-Sue
19 February 2012
This folded card uses the Grand Scalloped Circles to form the base of the card, and Floral Doily Motifs to create the flower.


Products Used:
Bazzill Basics Cardstock:
10-1001E White
Romance
Hillary
Vanilla
Spellbinders:
S5-041 Floral Doily Motifs
NEST-005 Nested Circles & Scalloped Circles
LF-124 Grand Scalloped Circles
S5-058 Ironwork Accents
S4-328 Foliage
JustRite Stamps:
CL02165 Be Strong
Other Materials Used:
White Fibres
Sparklet
Distress Ink-Tattered Rose
Card created by Design Team member-SUE
24 January 2012
Today we have a super cute summer layout to share with you.
"The banners were made with the small dies from the pennants sets. I only attached them at the top, leaving the ends to be gently bent up for extra dimension."


Products Used:
Bazzill Basics Cardstock:
7-703E Powder Blue
7-7117E Coastal
1-125E Precious
1-105E Petalsoft
Spellbinders:
S5-029 Nested Lacey Pennants
S5-028 Nested Pennants
E8-001 Edgeabilities Classic Scallop
Other Materials Used:
Cosmo Cricket DeLovely 6x6 paper pad
Glimmermist
Aqua
Prima alpha sticker
Adorn It alpha sticker tiles
Layout created by Design Team member-TERESA
23 January 2012
Today we have a monochromatic card in lovely warm shades of purple. Teresa has used a very very light shade of purple for the base card – not white as it would have been too stark.


Products Used:
Bazzill Basics Paper:
6-666E Angel
6-642E Heidi
6-603E Jubilee
6-605E Velvet
Spellbinders:
E8-001 Edgeabilities Classic Scallop
JustRite Stamps:
CL02080Cling - Fancy Tags Set
Other Materials Used:
Lilac grosgrain ribbon
SW4001 4mm Swarovski Crystal
Card created by Design Team member-TERESA
21 January 2012
Today we have a pretty card from Sue.
"This card uses 4 of the Iron work Motifs folded in four to form a lacey rosette."
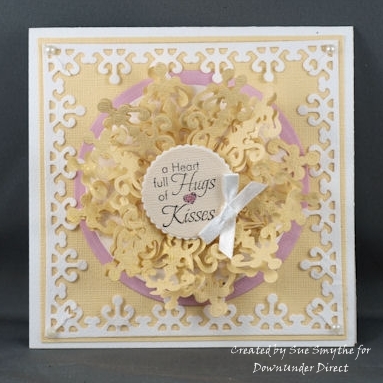
Products Used:
Bazzill Basics Cardstock:
4-426E Lemonade
1-105E Petalsoft
10-1010E White
8-808E Vanilla
Spellbinders:
S5-059Ironwork Motifs
S5-058 Ironwork Accents
NEST-005 Nested Circles
Just Rite Stamps:
JB09725 Loving Thoughts
Other Materials Used:
Sunflower Glimmer Mist
Pearls
Pink Stickles
Card created by Design Team member-Sue
26 November 2011
Here is a gift box I made using a JustRite Stamp box. If you've been a fan of JustRite Stamps for awhile, you probably have a few of these boxes lying around.


Products Used:
Bazzill Basics Cardstock:
2-245E Phoenix
15-255G Tomato
Spellbinders:
S5-055 Layered Poinsettia
NEST-001 Nested Ovals
JustRite Stamps:
JB09925 Peace on Earth
Other Materials Used:
Micro Beads
Glossy Accents
Ribbon
White Pigment Ink
White Embossing Powder
Christine Re Printed Paper
White Paint
Tip:
When covering the box with paper you have to keep in mind that the lid is already a tight fit. I covered the lid only and painted the base, sanding first before painting.
To add depth to the box and to stop the lid from covering the base completely, I inserted some foam tape inside the lid to make a lip and keep the lid sitting a little higher.
Off the page created by Design Team member-TRACEY
21 November 2011
Red and Green are the perfect colours for Christmas and the new Layered Poinsettia flower fits in this theme wonderfully.

Products Used:
Bazzill Basics Cardstock:
2-227E Pomegranate
5-5100D Pine Needle
8-808E Vanilla
Spellbinders:
S5-055 Layered Poinsettia
S5-058 Ironwork Accents
S5-071 Twisted Metal Tags & Accents
Other Materials Used:
Gold glitter
Glimmer mists
Ribbon
Plastic gems
White glitter
Green cotton
Chip alpha
Iridescent medium
Layout created by Design Team member-Sue
17 November 2011
Searching through my stash of craft materials I found some craft wood napkin rings. I've covered them by wrapping some ribbon around and securing with glue. I assembled four poinsettias and attached these to the rings for a quick holiday table accessory.

Products Used:
Bazzill Basics Paper:
15-255G Tomato
Spellbinders:
S5-055 Layered Poinsettia
Other Materials Used:
Tartan Ribbon
Brads
Wooden Napkin Rings
Project created by Design Team member-TRACEY
16 November 2011
Here is a card I made using the new Layered Poinsettia Die. If the leaf in the set is too large for the project you are doing, you can cut a flower into individual pieces and use the petals for leaves as I have done here.

Products Used:
Bazzill Basics Cardstock:
10-1001E White
2-227E Pomegranate
4-435E Curry Spice
Spellbinders:
S5-055 Layered Poinsettia
Other Materials Used:
Micro Beads
Glossy Accents to adhere beads
Versamark Pad to rub over embossed areas
Organza Ribbon
Card created by Design Team member-TRACEY
12 November 2011
Nothing says Christmas more than a star and a snowflake, it reminds us of all the lovely cozy feelings we have in winter, even if our winter is not at Christmas time it is still a time for family and coziness.

Products Used:
Bazzill Basics Cardstock:
7-784E Admiral
10-1001E White
7-701E Splash
Spellbinders:
S5-054 Snowflake Pendant 2011
S5-029 Nested Lacey Pennants
NEST-005 Nested Circles
I2-1003 Impressabilities Snowflakes
JustRite Stamps:
JB08780 A Merry Little Christmas Set
Other Materials Used:
White organza ribbon
Noel button
Blue fibre
White glitter
Clear crystals
Blue ink
Card created by Design Team member-Sue
11 November 2011
Today I have a card made using Ironwork Motifs. The large element works very well as a snowflake.

Products Used:
Bazzill Basics Paper:
10-1001E White
2-227E Pomegranate
Spellbinders:
S4-345 Picot Edge Circles
S5-059 Ironwork Motifs
Other Materials Used:
Christina Re Printed Paper
Large Diamante
Card created by Design Team member-TRACEY
10 November 2011
Here is a lovely idea for a framed layout. I love how the ornaments hang from the photo.
"One of my favourite things to do is make frames with my Nestabilities. I use
two consecutive dies to cut a thin frame. I have stitched it to my layout
here.
Sometimes the die that's the next size up is just too big and would leave a
border that's too wide. When that happens, I glue my shape to the next
colour cardstock and carefully trim around it with scissors."

Products Used:
Bazzill Basics Cardstock:
1-196E Juneberry
5-565E Aqua
18-801F Bling String of Pearls
Spellbinders:
S4-283 2010 Heirloom Ornaments
LF-246 Grand Labels Eleven
S4-092 Star 5 Dies
JustRite Stamps:
CL-02155 Merry & Bright
Other Materials Used:
Webster's Pages patterned paper
Alphas: American crafts, Making Memories
Page from an old book
Bling coloured with Copic markers
Layout created by Design Team member-TERESA
8 November 2011
This card uses a clever fold with A4 sized cardstock, decorated with the new Pointsettia die. Lots of space to hold a gift card or tag too.

Products Used:
Bazzill Basics Cardstock:
2-227E Pomegranate
8-808E Vanilla
10-1081E Raven
5-511E Hillary
303984 Love Story 12 x 12 Paper Pack
303984 Love Story 12 x 12 Paper Pack
Spellbinders:
S5-055 Layered Pointsettia
S4-328 Foliage
S5-058 Ironwork Accents
I2-1009 Impressiblities Flourish
Just Rite Stamps:
JB08780A Merry Little Christmas set
Other Materials Used:
28 October 2011
Here is another cute Halloween layout.
"In this layout I have used a mask of a tree and spritzed it with bleach to create the haunting back ground."
"In this layout I have used a mask of a tree and spritzed it with bleach to create the haunting back ground."

Products Used:
Bazzill Basics Paper:
10-1029D Elephant
10-1081E Raven
10-1042D Date Swirl
Spellbinders:
S5-059 Ironworks Motifs
S4-279 Halloween Scene & Graveyard
S4-280 Halloween Fence and Shapes
Other materials Used:
Bleach
Chipboard tree
Acrylic corner
Gold mica particles
Ribbon
Dimensional Magic
Black fibres
Gold Glimmer Mist
Googly eyes
Layout created by Design Team member-Sue
24 October 2011
Today's project is a simple all occasion card.

Products Used:
Bazzill Basics Cardstock:
10-1001E White
4-406E Chiffon
6-642E Heidi
6-605E Velvet
Spellbinders:
S4-345 Picot Edge Circles
S5-067 Anemone Flower Topper
S5-062 Lace Doily Accents
LF-012 Square Petal Top Box (Tag)
JustRite Stamps:
CL02120 Vintage Floral Labels
Other Materials Used:
Brilliance Pearlescent Crimson Inkpad
Yellow Pearl Button
Card created by Design Team member-TRACEY
23 October 2011
Here is another pretty card using the Spellbinder die Bird Sanctuary.


Products Used:
Bazzill Basics Paper:
10-1001E Bazzill White
7-799E Sea Salt
9-942E Twig
5-5122E Lizard
Spellbinders:
S5-033 Bird Sanctuary
S5-050 Rose Creations
S4-328 Foliage
Just Rite Stamps:
CL02100 Vintage Oval Labels
Other Materials Used:
Green Tara Roses
Card created by Design Team member-TERESA
18 October 2011
Today's tutorial is a technique that has been around for some time. I've been using this one for years with rubber stamps. I think that it is always good to bring back old techniques as they can sometimes be pushed aside and forgotten.
Today rather than using rubber stamps I have used Impressabilities to create a textured background.

Products Used:
Bazzill Basics Cardstock:
10-1001E White
2-226E Rosey
2-220E Foxy
Spellbinders:
S4-329 Butterfly Circles
S4-320 Nested Butterflies 2
Other Materials Used:
Versamark Pad
Pearl-ex Powders
Organza Ribbon
Spray fixative
Instructions:
Step One:
Cut desired shape using your Spellbinder dies.


Spray fixative
Instructions:
Step One:
Cut desired shape using your Spellbinder dies.

Step Two:
Place an Impressabilities on the base plate of your cutting machine.
Place the cut out shape on this.

Cover with the mat and top plate and run through your cutting machine. You now have the embossed shape.
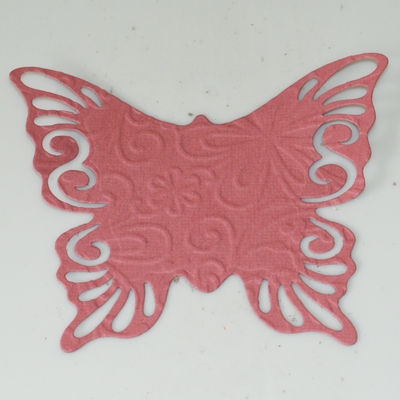
Very gently run the versamark pad over the shape. Only apply slight pressure as you want the ink on the raised parts only.

Using a soft paint brush, cover the shape completely with Pearl-ex powder Once again a soft touch is needed as you don't want to grind the powder into the paper.

Once the hape has been covered with the powder, rub over the entire shape with a tissue. This will remove the powder from everywhere except the raised areas.

Spray with a fixative if desired.
Tutorial created by Design Team member-TRACEY
Subscribe to:
Posts (Atom)