Showing posts with label Christmas. Show all posts
Showing posts with label Christmas. Show all posts
16 January 2014
Here is a fun idea from Teresa for some of your holiday photos.
I created interest on my page by using nested circle dies to create a
concentric focus. By using foam mounting tape, I could tuck the photo into
one of the layers, and mimic the layering that is present in the photo
itself.
I added some colour to the stark white by stamping little stars, flicking
navy Distress Stain and then strategically placing blobs of gesso here and
there. These blobs dried raised, adding extra dimension.


Bazzill Basics Cardstock:
10-1001E Bazzill White
1-120D Dark Rosey
7-783E Admiral
Spellbinders:
S4-116 Small Circles
LF-114 Grand Circles
S4-334 2011 Heirloom Ornaments
S5-199 Font One- Lower Case
Other Materials Used:
Darkroom Door Christmas Reindeer stamps
Chipped Sapphire Distress Stain
Gesso
Basic Grey 25th & Pine range of patterned papers
Silver cord
Created by Design Team member-TERESA
20 December 2013
Hello everyone. This is our final Christmas project for 2012. We will be having a few weeks off for the Christmas break. On behalf of all of us at DownUnder Direct Inspirations a very Merry Christmas and best wishes for the New Year.
For this card I added some glitter to the stamped image and coloured it with
my Copic markers in shades to match the patterned paper. I then stacked some
circle die cuts to the front of a Christmas bauble easel card.
.jpg)
Products Used:
Bazzill Basics Cardstock:
10-1032E Lily WhiteDB
Spellbinders:
S4-334 Heirloom Ornaments 2011
S4-114 Circles Large
S4-113 Classic Scalloped Ovals Small
Other Materials Used:
KaiserCraft patterned paper
Seam binding
Copic Markers
Glitter
StampIt Mistletoe stamp
Red flowers
Created by Design Team member-TERESA
And another pretty Christmas card for you today.


Products Used:
Bazzill Basics Paper:
9-960D Kraft
5-510E Parakeet
Spellbinders:
S4-414 Captivating Squares
S2-056 Holly Twigs and leaves
Other Materials Used:
Papermania papers
Ribbon
Ranger Liquid Pearls
Hero Arts stamp
Created by Design Team Member ALICIA
19 December 2013
Dies are not just for cutting shapes - this Grateful Lattice die has been
used to emboss the background on this card. The detail of the embossing has
been brought out with a little sponged ink.
.jpg)
Products Used:
Bazzill Basics Cardstock
816C Walnut Cream
2-214E Red Devil
5-589E Ivy
Spellbinders:
S5-164 Grateful Lattice
S2-016 Window Two
S5-055 Layered Poinsettia
Other Materials:
StampIt Merry Christmas stamp
KaiserCraft patterned paper
Adhesive Pearl
Created by Design Team member-TERESA
16 December 2013
Once a step card is cut, scored and folded, it's just a simple matter of
attaching pieces of patterned paper and a few embellishments. An impressive,
dimensional card can come together in no time at all, and best of all, it
packs flat for posting.

Products Used:
Bazzill Basics Cardstock:
2-214E Red Devil
Spellbinders:
S4-334 2011 Heriloom Ornaments
Other Materials Used:
My Mind's Eye Vintage Christmas 6x6 pad and chipboard embellishments
Red cord
Stamp It Merry Christmas stamp
Creaed by Design Team member-TERESA
8 December 2013
Here is a lovely idea for a quick Christmas gift. You could even use this as a decoration on your holiday table.
"I'm making a bunch of these as teacher thank you gifts from the kids."


Materials Used:
Bazzill Basics Paper:
10-1001 Bazzill white
Bazzill glitter tape
Spellbinders:
S2-048 Sprigs
S5-109 Vintage lace Motifs
S5-055 Layered Poinsettia
S5-158 Timeless Rectangle
Other Materials Used:
Hemptique twine
Hero Arts stamp
Created by Design Team Member ALICIA
7 December 2013
Here's a Christmas card in non-traditional colours. There's really no need
to wait for all of the paper companies to release their Christmas ranges
when there are so many beautiful ones available year round.

Products Used:
Bazzill Basics Cardstock:
8-816C Walnut Cream
2-245E Phoenix
Spellbinders:
S2-043 Frame Two Die D'Lites
S5-190 Noble Rectangle
S4-112 Ovals Small
Other Materials Used:
Cosmo Cricket Baby Jane patterned paper
Websters Pages cameo
Created by Design Team member-TERESA
Spellbinders Gold dies are amazing for letter press and embossing as they both can be achieved in one pass through the Grand Callibur Machine.


Products Used:
Bazzill Basics Cardstock:
2-214E Bazzill Red Devil
5-5154 Gumdrop
Spellbinders:
S4-409 Gold Magestic Circles
S5-055 Layered Poinsettia
Other Products:
Liquid Pearls – Buttercup
Red ink pad
Created by Design Team member- BECK
27 November 2013
I'm loving the easel card at the moment. The little bit of extra work you
put into a card really pays off. I assembled this one in a similar fashion
to the butterfly easel card I showed in a post a few weeks ago.

Bazzill Basics Cardstock:
8-816C Walnut Cream
Spellbinders:
S2-116 Small Circles
S4-334 2011 Heirloom Ornaments
Other Materials Used:
My Mind's Eye Vintage Christmas 6x6 pad and chipboard stickers
Gold cord
Created by Design Team member -TERESA
20 November 2013
Sometimes it's a little disappointing when a die doesn't cut all the way
through a material. Other times it can work to your advantage. Take this
corrugated cardboard - the circle die didn't cut all the way through, but it
cut through enough to enable me to easily remove a layer to expose the
corrugations. Perfect!


Products Used:
Bazzill Basics Cardstock:
10-1023E White
Spellbinders:
S4-116 Small Circles
S4-126 Squares
S4-348 Postage Stamps
Other Materials Used:
Darkroom Door Christmas Reindeer stamps
Silver Flowersoft
Authentique patterned paper
Corrugated cardboard
Created by Design Team member-TERESA
22 October 2013
It's time to start thinking about making some Christmas cards so today we have a lovely Christmas card from Alicia to inspire you.


Materials Used:
Bazzill Basics Paper:
10-1001 Bazzill white
5-510E Parakeet
2-214E Red Devil
Spellbinders:
S4-328 Foliage
S6-008 Exquisite labels eleven
S5-055 Layered Poinsettia
Other Materials Used:
Do Craft First Noel patterned paper
Ranger Liquid Pearls" white opal
Stampendous Tis the Season stamps
Created by Design Team Member ALICIA
19 July 2013
Here is another fun Christmas idea from Alicia


Products Used:
Bazzill Basics Paper:
2-214E Red Devil
10-1001 White
5-589E Ivy
Spellbinders:
S5-040 Floral Doily Accent
S5-055 Layered Poinsettia
Other Materials Used:
Twine
Paper
Straws
Created by Design Team Member -ALICIA
18 July 2013
My liking for unusual Christmas colour combinations continues. Here I've
used aqua and orange to decorate a polystyrene wreath that has been wrapped
with tea stained calico. The bling and pearl headed pins were colour matched
with a Copic marker.


Products Used:
Bazzill Basics Cardstock
8-811E French Vanilla
7-792E Tropical
Spellbinders
S5-122 Ribbon Banners Large
S5-143 Jewel Flowers and Flourishes
Other Materials Used:
KaiserCraft bling
Pearl headed pins
C
opic Marker YR07
Basic Grey What's Up 6x6 paper pad
Paper Smooches Joyful Greetings stamp set
Strips of tea stained calico
Polystyrene wreath
Twine
Created by Design Team member-TERESA
16 July 2013
I love the neutral tones in this Christmas card, perfect for any part of the world- warm or cold.


Products Used:
Bazzill Basics Cardstock:
Bazzill Basics multipack – Kraft
9-690D - Kraft
Spellbinders:
S5-159 Gold Labels four
S5-082 – Nautical Frames and Accents
Other Products:
Ranger Distress ink
Assorted trim
Kaisercraft pattern paper
Helmar Liquid Scrap Dots
Helmar 450 Quick Dry
Created by Design Team member-BECK
15 July 2013
Hello everyone and welcome to Christmas in July. We will be celebrating Christmas crafting with a week of Christmas projects.
To start us off we have a pretty step card in traditional Christmas colours.

Products Used:
Bazzill Basics Paper:
SC5-531 Bazzill Green Centre Step Card
S-531E Bazzill Green
2-216 Ruby Slipper
303982 Holiday style 8x8 pack
Spellbinders:
S4-346 Labels Twenty Two
S5-055 Layered Poinsettia
Other Materials Used:
HOTP Christmas Art Stamps
Pearls
Ribbon
Gold stamp pad
Memento stamp pad
Created by Design Team member- CAROLYN
24 December 2012
Just one final post before we take a break for the holidays. On behalf of everyone on the DownUnder Design Team a Very Merry Christmas. Have a safe and happy holiday season. We will be back in early January with more wonderful projects.


Products Used:
Bazzill Basics Cardstock:
304085 Antique Sheet Music
Bazzill Basics Paper Range – Divinely Sweet
10-1001E Bazzill White
2-214E Red Devil
5-510E Parakeet
303904 - Perfectly Pleated Lily White
Spellbinders:
S5-028 – Nested Pennants
S5-029 Nested Lacey Pennants
S4-032 Stars five
Other Products:
The Crafters Workshop 12 x 12 stencil – TCW219
Texture paste
Jo Sonya’s Napthol Crimson acrylic paint
Faber-Castell Pitt pastel pencil – 1122-168
Red ric rac ribbon
Helmar Acid Free Glue
Helmar 450 Quick Dry
American Crafts Dear Lizzy Thickers - Charmed
Created by Design Team member-BECK
22 December 2012
"This was intended as a tag to go on a gift, but it really could go on the
front of a card, or even be hung on the Christmas tree as an ornament."


Bazzill:
10-1047E Salt
304275 Beach House 6x6 mini prints
Spellbinders:
S5-127 Labels Twenty Eight
S4-092 Star 5 Dies
S4-314 Lacey Ovals
S4-114 Circles Large
JustRite Stamps:
CR-03800 Large Fancy Holiday Sentiments
Other Materials:
Bakers twine
Vintage Photo Distress Ink
Created by Design Team member-TERESA
21 December 2012
I'm sure that like myself many will have one of these paper mache reindeer lying around. I bought one ages ago with the intention of doing something quick and easy with it. Here is a great idea to do just that.


Products Used:
Bazzill Basics Cardstock:
10-1001E White
2-214E Red Devil
Spellbinders:
S5-055 Layered poinsettia
S5-129 foliage 2
S5-086 Bitty Blossoms
Other Materials Used:
Paper Mache reindeer
Jingle bells
Ribbon
Twine
Ranger perfect pearls
Clear snap fairy glitter
Pearls
White Acrylic paint
Created by Design Team member- ALICIA
19 December 2012
Welcome to our final Christmas project tutorial for 2012. We hope you enjoy this very cute present card from Carolyn.


Products Used:
Bazzill Basics Paper:
2-124E Red Devil
10-1001E White
5-510E Parakeet
303982 Holiday style 8x8 pack
Spellbinders:
S4-113 Scallop Ovals small
S4-110 Ovals Large
S4-294 Beaded Ovals
JustRite Stamps:
CR-03805 Noel Christmas Ornaments
CR-03780 Christmas tags one
Other Materials Used:
Ribbon
Creative Imaginations epoxy stickers
Step 1:
Cut two pieces of cardstock one to measure 5 1/2" x 11". The other piece measuring 6"x 3".

Step 2:
Score both pieces in half the first piece that is 11" score at 5 1/2 and the other piece that is 6" score at 1 1/2".

Step 3:
With your piece that will now be the present bottom make sure the scored edge is at the bottom. I used a strong double sided tape but you could use glue if preferred. Run glue/tape down the 2 sides remembering the bottom is already scored so no need to do that and you need to leave the top open. Do the same with the smaller piece but this time the scored edge will now be the top and the bottom needs to be left open so it can be used as a lid for the present.

Step 4:
Now cut a piece of patterned paper so that it is slightly smaller than your original measurements halved and attach to the present as in the photo below.


Step 5: Cut a piece of cardstock to measure 5" X 5" any bigger will make it hard to move in and out of the present. Then cut a complimentary colour just a bit smaller and adhere the smaller piece to the larger piece this will be your card that slips in the top of the present.

Step 6:
Decorate this panel as desired. Keeping in mind it is best to keep with flat embellishing as it must move freely in and out of your present.

Step 7:
Your present card should now look like this.

Step 8:
Cut a strip to measure approx 1 1/2 wide and the length of the patterned paper on both parts of your present. I used a xyron sticker maker commonly known as an x box to add adhesive to my ribbon, but you may choose to use glue or tape. Adhere your ribbon to the centre of both pieces of the cardstock you have just cut. Adhere to the centre of both pieces of your present.

Step 9:
Using the same ribbon you used for the centre of your presents tie a bow and glue to the top middle of your present then embellish as desired.
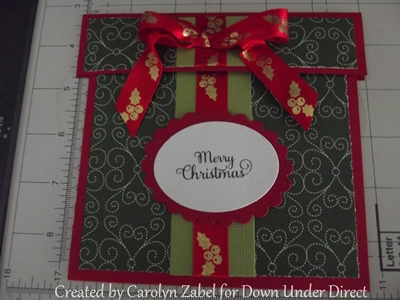
Tutorial created by Design Team member-CAROLYN
17 December 2012
Today's project is a lovely Christmas decorating idea.


Products Used:
Bazzill Basics Cardstock:
Wayfarer Collection –Traveller sheet
8-811E French Vanilla
Spellbinders:
S5-028 – Nested Pennants
S5-029 Nested Lacey Pennants
Just Rite Stamps:
CL03725 - Fleuriste Newsprint Background Stamp
Other Products:
Heidi Swapp foam alpha stamp set
Papercraft Fine glitter Red
Jo Sonya’s Napthol Crimson acrylic paint
Momento Ink pad – black
Helmar Acid Free Glue
Helmar 450 Quick Dry
Created by Design Team member-BECK
Subscribe to:
Posts (Atom)