Showing posts with label Spellbinders CHA Jan 2013. Show all posts
Showing posts with label Spellbinders CHA Jan 2013. Show all posts
4 May 2013
The Spellbinders Die D- lites Grate works makes great dimension when adhered to contrasting cardstock.

Bazzill Basics Cardstock:
19-10305E Vanilla Cream
8-850E Fawn
5-511E Hillary
1-140E Petunia
Spellbinders:
S4-328 Foliage
S5-086 Bitty Blossoms
S2-019 Grateworks
S5-146 Botanical Swirls and Accents
S5-175 A2 locking Loops
Just Rite Stamps:
CR-03815 Large Fancy Sentiments
Other Materials Used:
Pearl strip
White glitter
Tea Dye Ranger Tim Holtz Distress Ink
White ribbon
Book page
Created by Design Team member-SUE
2 May 2013
Today's project comes from Carolyn.
Soft pastel colours make this card suitable for a birthday or a wedding

Products Used:
Bazzill Basics Paper:
10-10001 White
6-617D Dream DB
Spellbinders:
S5-174 A2 Distressed edges
S5-086 Bitty Blossoms
JustRite Stamps:
CL-03545 Your special day medallion labels
Other Materials Used:
Pearls
Organza Ribbon
Created by Design Team member- CAROLYN
29 April 2013
Today we have a fun and bright boy layout to share with you.


Products Used:
Bazzill Basics Paper:
10-1001 Bazzill white
9-960D Kraft
303901 Kiwi Pleated cardstock
Spellbinders:
S5-181 Borderabilities Card Creator A2 Bracket Borders
S5-183 Gold Elements one
S6-003 5x7 enchanted labels
Other Materials Used:
Echo Park patterned papers and stickers
Bakers Twine
Created by Design Team member- ALICIA
18 April 2013
Easel cards are so easy to create using Spellbinder dies.

Products Used:
Bazzill Basics Paper:
1-001E White
1-105E Petalsoft
Spellbinders:
LF-018 Grand decorative labels One
S5-179 Pinwheel delight
Other Materials Used:
Pearls
Ribbon
Created by Design Team member- CAROLYN
14 April 2013
In this post, I'd like to show you how I used one die two different ways -
to cut, and then to emboss.


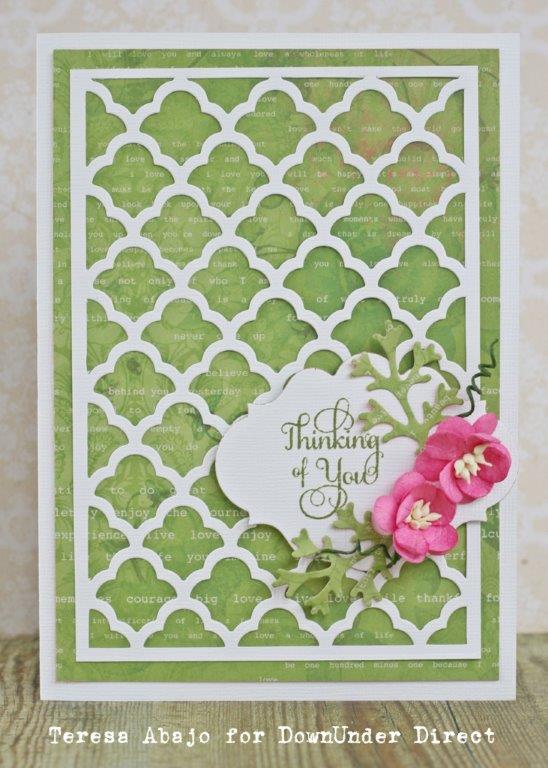
Products Used:
Bazzill Basics Cardstock:
10-1001E White
Spellbinders:
S5-164 Grateful Lattice
S5-026 Labels Twenty
S4-328 Foliage
JustRite Stamps:
CR-03815 Large Fancy Sentiments
Other Products Used:
KaiserCraft Flirtacious patterned paper
Cherry blossom flowers
Created by DEsign Team member-TERESA
9 April 2013
Love is in the air with this pretty love inspired card.


Products Used:
Bazzill Basics Paper:
10-1001 White
1-105E Petalsoft
Spellbinders:
S4-351 Spiral Blossom 1
S4-387 Decorative Labels 22
S4-318 Fleur de Lis squares
Other Materials Used:
Kaisercraft patterned papers
Kaisercraft rubon
Ranger perfect pearls
Satin ribbon
Created by Design Team member-ALICIA
8 April 2013
Die D- lites window makes a wonderful focal point for a card.

Bazzill Basics Cardstock:
10-1001E White
5-511E Hillary
1-140E Petunia
3-312D Peach
Spellbinders:
S5-129 Foliage Two
S5-086 Bitty Blossoms
S2-017 Window one
E3D-005 3 D M-bossabilities
Ornamental Swirls
Other Materials Used:
Pearl strip
White embossing powder
Green Inka Gold
Gesso
White ribbon
Sunshine Glimmer Mist
Card created by Design Team member-Sue
7 April 2013
Today we have a quick and easy layout from Carolyn

Products Used:
Bazzill Basics Paper:
9-960D Kraft
7-706 Starmist
2-216 Ruby slipper
Spellbinders:
S4-116 Circles small
S5-179 Pinwheel Delight
S4-392 Framed Tags One
Other Materials Used:
7 gypsies tape
Glimmer mist
String
Basic Grey white choc chip alphabet
Kaisercraft mini alphabets.
Created by Design Team member- CAROLYN
4 April 2013
"Try using your Embossing folders in a different way, I used one here as a stamp to create more interest in the background of this layout."


Products Used:
Bazzill Basics Cardstock:
Bazzill Basics Paper Range – School Days
10-1001E Bazzill White
Spellbinders:
S4-116 – Standard Circles Small
EL-027 Numbers and Letters M-Boss folder
Other ProductsUsed:
Gesso
Donna Salazar Mixed Media Inx
Prima Artist stencils - Chevron
Helmar 450 Quick Dry
Helmar Liquid Scrap Dots
Assorted washi tape
Created by Design Team member-BECK
2 April 2013

Products Used:
Bazzill Basics Paper:
9-960D Kraft
1-141 Brandywine
1-196 Juneberry
Spellbinders:
S5-160 Opulent Ovals
S5-086 Bitty Blossoms
JustRite Stamps:
CL-03535 Always and Forever medallion labels
Other Materials Used:
Pearls
Organza
Tim Holtz distress ink
Instructions:
Choose a set of spellbinder dies that will give you a nice sized shape to work with. I used 3 different sizes ranging from the largest, second largest down to the third largest.
Choose a set of spellbinder dies that will give you a nice sized shape to work with. I used 3 different sizes ranging from the largest, second largest down to the third largest.
Step One:
Fold your piece of cardstock in half. Place your die under your folded cardstock with the folded edge to the top. Place your die so the top part is out from under your cardstock as shown in diagram, this ensures your 2 pieces will remain joined.


Step Two:
Once you have cut the main card and embossed. Cut just one shape from your die the same size with 1 piece of unfolded cardstock. Once again emboss.

Step Three:
Using your next 2 sized dies and your choice of colours cut 2 of each size one being for the top and one for the bottom and emboss.

Step Four:
Now go back to the first piece we cut and choose which side you want to be your right side whether it be embossed or de-bossed and fold the top half in half towards you. When positioned up this will become your easel to position the top of your card.

Step Five:
Add adhesive tape or glue to the half you have folded down and adhere your 1st single shape you cut to this then layer the shapes you cut alternatively.


Step Eight:
Embellish to your hearts desire.
TIP:
I do my stamping before I adhere the final die cut to the card and embellish once it is altogether.
Tutorial created by Design Team member-CAROLYN
24 March 2013
Here is a card I made using one of the newest Spellbinder dies Ornate Squares.

Products Used:
Bazzill Basics Cardstock:
10-1001E White
10-1081E Raven
304305 Basics 6x6 Collection Licorice
10-1081E Raven
304305 Basics 6x6 Collection Licorice
Spellbinders:
S5-166 Ornate Squares
S5-086 Bitty Blossoms
S5-086 Bitty Blossoms
Other Materials Used:
Satin ribbon
Pearls
Pearls
Created by Design Team member-TRACEY
22 March 2013
Today we have another card featuring the latest from Spellbinders.


Bazzill Basics Paper:
10-1001 White
1-105E Petalsoft
Spellbinders:
S5-086 Bitty Blossoms
S5-181 Borderabilities Card Creator A2 Bracket Borders
S4-387 Decorative Labels 22
EG-001 Graduated dots M-bossibilities
JustRite Stamps:
CR-03815 Large Fancy Sentiments
Other Materials Used:
Ranger perfect pearls
Organza ribbon
Created by Design Team member-ALICIA
21 March 2013
I'm starting to enjoy using these Cut, Fold, Tuck dies. They're not really
that hard to put together, and they look fantastic when used with double
sided papers with contrasting colours or patterns."

Bazzill Basics Cardstock:
10-1001E White
Spellbinders:
S5-179 Pinwheel Delight
JustRite Stamps:
CR-03885 Grand Sentiments
Other Materials Used:
My Mind's Eye Follow your Heart 6x6 patterned paper
Silver flower centre trim
Card created by Design Team member-TERESA
16 March 2013
"I looked around for something to build a little fairy house with, and came
up with this tiny little tin. Mine had tomato paste in it, but any tin would
do (eg baby food).
The roof was made by cutting a slit in a circle, then overlapping one side
over the other. I embossed it with one of the new 3D M-Bossabilities folders
- I'm amazed at the detail!
The door is a Labels Twenty Eight die cut with a brad for the door knob and
embossed to look like woodgrain."

Products Used:
Bazzill Basics Cardstock:
9-942E Twig
Spellbinders:
S5-127 Labels Twenty Eight
E3D-004 Basket Weave
EL-015 Bricks and Bark M-bossabilities
S4-114 Circles Large
Other materials Used:
Kaisercraft Marmalade patterned paper
Project created by Design Team member-TERESA
15 March 2013
Today's project features the new Les Papillions Two die.
"Try playing around with the same paper collection in 3’s to get a lovely set of tags, perfect to add to upcoming presents or simply to add to a future Scrapbooking layout or card as a decorative element."

Products Used:
Bazzill Basics Cardstock:
9-960D Kraft
Bazzill Basics Paper Range – Miss Teagan Sue Mini Prints
Spellbinders:
S4-395 Les Papillions Two
S5-040 Floral Doily Accents
Other Products Used:
Helmar 450 Quick Dry
Assorted Grosgrain Ribbon
Tim Holtz Distress Marker
Liquid Pearls
Tim Holtz Distress ink
Created by Design Team member- BECK
13 March 2013
"Now that DownUnder Direct has done the hard work making the step cards available to us it's so simple and quick to have yourself a pretty card in no time."

Products Used:
Bazzill Basics Paper:
Bazzill Middle step card neutrals mixed
6-620 Wisteria
Spellbinders:
S4-400 Gold Ivy
S5-172 A2 Curved Matting Basics B
S4-371 Les Papillions
S5-061 Daisy Flower topper
JustRite Stamps:
CL-03535 Always and Forever Medallion Labels
Other Materials Used:
Ribbon
StazOn ink
3D Foam tape
Organza ribbon
Pearls
Created by Design Team member- CAROLYN
12 March 2013
"Playing around with acryclic paints, and I came up with this faux copper
effect. It turns out so realistic, people will have trouble believing that
it's just paint and cardstock!"

Products Used:
Bazzill Basics Cardstock:
9-960D Kraft
7-7116E Simon
10-1037E Blackbird
Spellbinders:
E3D-003 Delightful Daisies
JustRite Stamps:
CR-03885 Grand Sentiments
Other Materials Used:
Blue and Copper acrylic paint
Tsukineko Java Walnut Stain
Black German Glass Glitter
Step 1
Emboss two pieces of cardstock using the new 3D M-Bossabilities Delightful
Daisies folder. Fussy cut two daisies, one butterfly and the banner from one
piece.

Step 2
Paint all of the pieces with the blue acrylic paint, covering all of the
kraft cardstock.

Step 3
Once dry, paint a very light coat of copper paint. This can be left streaky
to show some of the blue paint underneath.
While it's still wet, wipe over it with a damp paper towel. Allow to dry.


Step 4
Spray lightly with the Walnut ink, and wipe all over the embossed pieces
with a dry paper towel.
Flick some water droplets onto the piece and watch the water clear spots in
the walnut ink layer.
(Pic 3 below): See the difference the Walnut Ink has made to the paint finish.
It's like a patina.


Step 5
Stamp the sentiment onto the banner. Assemble the card, adding some black
German glass glitter to the flower centres.
Tutorial created by Design Team member-TERESA
10 March 2013
Just a quick idea today to give your storage that personal touch.


Products Used:
Bazzill Basics Cardstock:
10-1001E Bazzill White
Spellbinders:
S5-157 Labels Thirty
ES-014 - Quilted Delight
Other Products Used:
Helmar 450 Quick Dry
Assorted Ribbon
PanPastels
Tim Holtz Distress Marker
Tim Holtz Distress ink
Created by Design Team member- BECK
9 March 2013
"I am teaching Design and Technology this year, so I decided to make this banner to go on my main noticeboard in the classroom where I will have all the class rules. I layered two of the matt dies together to create a frame effect."


Bazzill Basics Paper:
10-1001 White
4-406E Chiffon
10-1071E Smoky
Spellbinders:
S5-171 Curved Matting
S5-109 Vintage Lace Motifs
Other Materials Used:
Adorn It patterned papers
Satin ribbon
Baker's Twine
Created by Design Team member- ALICIA
7 March 2013
Today we have another boy layout to share.

Products Used:
Bazzill Basics Paper:
5-506 Aloe Vera
9-973 Walnut
Spellbinders:
LF-018 Grand Decorative labels One
S4-392 Framed Tags One
S5-168 On the edge
S5-168 On the edge
S5-179 Pinwheel Delight
Other Materials Used:
Fancy Pants & Kaisercraft paper
Basic Grey rubons
String
Brads,
Lollypop sticks
Tim Holtz-Vintage Photo Distress inkpad
Created by Design Team member- CAROLYN
Subscribe to:
Posts (Atom)